Monday, 7 December 2020

Chrome Extensions to Help with Remote, Online and Hybrid Teaching

Are you teaching remotely or in a hybrid model?  Here are a few Chrome Extensions that might make your life just a little easier! Do you have others? Leave them in the comments.


The Great Suspender

Since I started using this extension  I have noticed a significance cut down on the lag in my computer. This extension temporarily puts tab to “sleep” and cuts down on exhausting your computer’s memory.  To wake a tab back up, simply click the tab and click in the window.  It is perfect for those with “Tabitis” - the condition of chronically having dozens of tabs open at a time.


Toby Mini

This is another one that is great for those with “Tabitis”. Toby Mini allows you to make collections of tabs that you can open all at one and share! 


I have a Toby collection for each of my classes and when I lesson plan I save resources to the collection so I can access everything easily and open things quickly come class time. 


Web Paint

Draw shapes, lines, and add text to live web pages and take screenshot. 


I use this when I am presenting my screen in online classes to draw students’ attention to important information - much like how I use my position in class!


Custom Cursor

Fun custom cursors for Chrome. Use a large collection of free cursors or upload your own.  


I love this extension because I find that I point things out with my cursor but it is so small!  This helps make the cursor more visible. 


Tab Mute

This extension does exactly what the name says - it mutes a tab.  This used to be a feature built into Chrome but in one of the latest updates it is gone 😭 and now you can only mute an entire site. So, if you have three Google Meets open and you only want to listen to one, right clicking the tab and selecting “mute site” will mute all three tabs! The Mute Tab extension allows you to mute two and listen to the third. It’s great for breakout rooms! 


Clipboard History Pro

This extension remembers everything you have ever copied and puts it into a memory bank of sorts. When you click the extension  everything you have copied pops up. You can favourite these two have for future pasting purposes.


I am giving feedback digitally all the time. I  I'm also sending emails and Google chats way more than I ever have before since I'm not seeing my students face to face daily.  I love this extension when I need to send a similar message out to students. I have a ton of things I say a lot so I have saved them in my favourites in the extension. 


Dualless

We are now living in a world where multiple screens are real thing but we don't all have the privilege of having a second monitor. This is where Dueless comes in!   This extension splits your screen into preset ratios. This is really great if you want to keep your eye on a chat in Google Meet but also see the screen you are presenting.


Note: While I love this extension, I do not use it a lot because it unpins your pinned tabs.


Screencastify

This extension is great for making short screencasts to share instructions with students. Videos save to your Google Drive and can be shared easily by a link or through Google Classroom.  


The free version only allows up to 5 minutes but really, who wants to watch a screencast for longer than 5 minutes? This is also great for leaving instructions for students on days you are going to be away. 


Iorad

Speaking of offering instruction, Iorad is second to none in that department. This extension allows you to make step-by-step tutorials. All you need to do is walk through the steps on your own and the extension captures every click you make and turns it into a beautiful, editable, tutorial that can be shared with others.


Voice In Typing

My brain works a lot faster than my fingers and with all the feedback I'm typing so I love any time I can use voice to type technology.   In Google Docs I can simply use the voice

typing feature, but in Google Classroom, when I leave private comments on students’ work,


 I have fallen completely in love with the Voice in Typing extension. ( I love it so much, I paid the $25 for the yearly subscription!) It has been a total Game Changer and I find I am able to leave far more feedback in a fraction of the time.


Awesome ScreenShot and Screen Recorder

This extension allows you to take screenshots beyond the screen you're looking at! It will

take a screenshot of the full webpage or part of a site so you just scroll down as far as you

need, click a button et Voila! A screen shot of more than just your screen.  Once you have

taken the shot, you can annotate to your heart's desire.


Extensions Manager (Switcher)

Now that you have all these great new extensions, you might find that Chrome is slowing

down significantly. Check out Switcher to help with that.  Switcher is an extension manager.

It allows you to turn extension on and off at the click of a button so you don't experience

Chrome slow down.  I particularly love this extension because not only does it tell you the

name of the extension but also a brief description so if you forgot what extension does, you

can find out here!


Sunday, 3 May 2020

How to Edit Auto-Generated Captions in YouTube

Captions are beneficial for many when watching any kind of video file.  We know that they are essential for those who are deaf/hard of hearing, but they can benefit many people in a variety of ways - for example, I always watch TV with captions on in case I miss something so I don't have to rewind.

My friend Noa reached out this morning to ask how to create caption in YouTube.  I explained that captions are auto-generated in YouTube and that the video create can edit them. 

I made this 3 minute video explaining how you can edit the auto-generated caption in YouTube.   Written directions are below.


  1. Sign in to YouTube Studio.
  2. From the left menu, select Subtitles.
  3. Click the video you’d like to edit.
  4. For the language you’d like to edit, in the “Subtitles” column, select Options (the timbits)  --> Edit in Classic Studio.
  5. At the top right, click Edit.
  6. Click on the caption track you want to edit - for me this is usually English (automatic).
  7. Click inside any line in the caption track panel and edit the text.
  8. When you’ve finished making changes, click Publish edits, at the top right.
(instructions are mostly from Google Support)

Thursday, 30 April 2020

Snapdrop - transfer files across multiple platforms

We're into week 4 of Emergency Remote Learning (6 if you count the two weeks that were not teacher led) and we have had our fair share of challenges.  We are fortunately to be a tech rich household.  My husband has his PC laptop, I have my Macbook Pro laptop, My oldest son has an iPad and my younger sons each have a Chromebook.  We also have 4 iPhones to use between the 5 of us (two are old ones with no SIM card so are more like iPods since they can't make calls and have no data but can access wifi).  One of the challenges we have faced in when the boys (who are in grades 2 & 4) do work that we need to photograph and put on a Google Slide (for example).  With our older son it was easy, take a photo, airdrop it to his iPad...but for the other guys - no such luck - until now!!

Our old workflow was as follows:
  1. Take a picture on my phone
  2. Airdrop it to my Mac.
  3. Log in to child's Chrome Profile on my Mac
  4. Upload it to their Google Drive
  5. Remind child, who has lost all focus, that we are still working on THEIR work.
  6. Child whines a lot, finds the file and uploads it to the Slide.
Then, my friend Joel Charlebois told me about Snapdrop.  #GAMECHANGER.  It is, as they "the easiest way to transfer files across devices" on the same wifi network.

Snapdrop

I have bookmarked Snapdrop on each device in the house (and added it to my homescreen on the my iPhone).  Now, when we take a picture on one device, we simply open Snapdop on the device with the image and on the the device we want to receive the image.  (In Snapdrop you see all the devices on the network with Snapdrop open - as in the image below)


From the device with the image, click the device to which you want to transfer.  A dialog box will open showing the files on your device.  Find and click the file you want to send.  The receiving computer will see that a file is being transferred.

When the transfer is complete, it will ask if you want to download the file to your device.  If you do, click download, if not, click ignore.


If you choose to download the file, a dialog box will open asking where on the device you want to store the file.   Select your destination and the file is now saved on that device!

It is a great way to transfer across platforms as it work on iOS, MacOS, Android, Windows, etc.

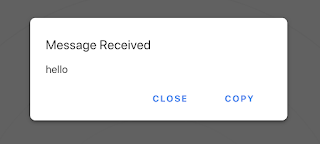
Also, you can send messages from one computer to another by right clicking the device name (or long holding on a mobile device).  A message box will appear, you can type a message and hit send.  The message will appear on that device where Snapdrop is open.


Note, None of your files are ever sent to any server. See the Snapdrop FAQ for more about their privacy.

Inserting Audio into Google Slides

Looking for an easy way to insert audio into Google Slides?  Watch this 4 minute How To video, and/or see the steps below.


Step 1: Record your voice
  1. Go to online-voice-recorder.com
  2. Click the record button (the red mic).
  3. Start talking!  When you are done, press the red button to stop.
  4. Click Save.  (The video will be saved to your computer - pay attention  to where so you can find it.)
Step 2: Upload the audio file to your Google Drive
  1. Go to your Google Drive.
  2. Optional: Create a folder for all your audio files.  
    • To create a folder:
      • Click New --> Folder --> Name it (e.g., Audio recordings)
    • DON'T FORGET TO MAKE YOUR FOLDER (or just file if you don't make a folder) VISIBLE TO PEOPLE.
      • Open sharing setting so anyone in your district has access to hear the audio.
        • Right click the folder and click Share
        • In the pop-up dialogue box,  click Get shareable link in the top right corner.
        • In an education account, by default it will allow everyone in that domain (with that kind of email account) to view (or in this case listen).    Make your choice and click Done.
        • If you have made the folder, every file you put in that folder will have that sharing setting so no need to do it again and again (hence my prefenece for the folder).
  3. Upload the audio recording. 
    • To upload:
      • Click New --> File Upload (find the file from Step 1 on your computer)
Step 3: Insert the Audio into your Google Slide
  1. On your Google Slide, Insert the audio
    • To insert audio:
      • Click Insert --> Audio
      • Select the file you recorded in step 1 and uploaded in step 2 and click Select
  2. A grey speaker icon will appear on the slide - this is the audio.  You can move it and adjust its size as desired

Bonus:  You can also attach the file to a Google Classroom Stream or Classwork post!

Bitmoji Image


Sunday, 26 April 2020

A Whiteboard extension for Google Meet

This morning I woke up and the first post on my Twitter feed was by Darren White about a new Google Meet extension called Google Meet Classroom Extension which adds a raise hand feature and whiteboard into Google Meet.  It allows for drawing, inserting typed text and LaTeX math.  Darren showcases the tool nicely in this video (consider subscribing, he's got good Google stuff on there!):


So, of course, I jump on my computer to give it a try and here are my initial thoughts:

Pros:

  • Simple integration of a whiteboard - note you need to be in Present mode then start the whiteboard or only you will see it.
  • Math and chem formulas enter easily with LaTeX.
  • Slick interface as the buttons appear on the bottom bar.

Cons

  • The raise hand feature wasn't working for me - only the person with the raises hand saw their hand was raised.  Apparently there can be up to a 20 second delay - and truth be told I did it quickly.
  • Can't see the chat etc. when activated, take sthe whole window (when i saw this I was hoping it was a little screen within the Meet window, but alas, no.
  • Can't insert an image to annotate (Jamboard much more dynamic).
  • Apparently the creator's server is maxed out so not sure if it might start crashing.

Overall - simple for a quick whiteboard, good for beginner users, personally I would stick with Jamboard, AWW App or Whitebord.fi for anything beyond a basic need to show something quickly.

Monday, 13 April 2020

7 Google Classroom Tips for Teachers

In this time of Emergency Remote Learning (I purposely call it that thanks for AJ Juliani's points in this blog post), many teachers are using Google Classroom more and more.  Some are comfortable with the tool, others are brand new.

If you are a Canadian educator and you are new to Google Classroom and want some FREE PD, check out EdTech Team Canada's Virtual Learning Series.  

For those who are familiar with Google Classroom and want a few pro tips - I have create a slide deck which has 7 Google Classroom tips for teachers including:

  1. Creating and accessing the Comments Bank, 
  2. Quickly Switching between student work when grading, 
  3. Annotating student work in the mobile app, 
  4. Tagging Students in comments, 
  5. Managing notifications (to free up your inbox!), 
  6. Adding audio instruction and feedback
  7. Adding video instructions!
Click the image below for the slide deck!


Saturday, 14 March 2020

COVID-19 - Feeling overwhelmed? You are not alone.


We are in a pandemic - and I am worried. Not about contracting COVID-19 but about my well being, and the well being of other teacher parents, during school closures due to the pandemic.

Bitmoji ImageYou see, I am a perfectionist. My standards are high - and the ones I often place on myself can be unattainable at times. I know I am not alone in this.

I have watched my Twitter feed explode with people sharing plans of how to support learning from a distance as schools close. I wait in anticipation the plan Ontario government says it will provide in the near future to help navigate these unknown waters. I see article after article touting the latest EdTech companies that have made all premium features free for the next while to support distance learning (like this list or this Wakelet created by my friend Brian Briggs). It is such great stuff!! I get so excited about all that I will be able to do, I begin digitally hoarding, writing pseudo lesson plans for my children and my students in preparation. And then the panic sets in.

The more I read, the more I feel like I am going to do it all wrong. Perfection Paralysis.  The more I know, the less competent I seem to feel. I want to capitalize on all the great things out there. I know the phenomenal learning environment I stand to create for my children. BUT….

I am a teacher, but I am not a homeschooler. When I work at my school I have a live support system. I can bat around ideas with others teaching the same thing, the same kids. I have resources at my disposal. I have a lunch hour, prep time. I have an escape when I go home at the end of the day - a change of pace. With the school closure, I do not.

Teaching our own children is different. I will be dealing with sibling rivalry, keeping kids quiet while my husband (who works on commission) takes phone calls as his office has been socially responsible and closed for a few weeks too. Our normal weekend attitude is pretty laissez-faire - weekends are for rest and rejuvenation, this will be a shift for all of us.

I know what good teaching looks like, and I don’t want to mess this up. I find myself learning two new curriculums to meet my children’s needs, to make sure they don’t “fall behind” (of what or whom I am not sure). I am digitally hoarding activities that would be “perfect” to “get us through” these three weeks - both my own children and the children I serve.

Then there is the added pressure to support our students from afar. How can I support them when the relationships we have built were in person. How will I tell that Bryan is having a bad day when I can’t see how he sits in his chairs (his “tell sign” for his mood). What about the moral support my crew of girls needs at lunch when they visit me in the Library. What about the kids who come in every day because this is where they feel comfortable? I read that social isolation leads to increased episodes of domestic violence. How can we help when we are not there? We all know that teaching is not 9-3, summers off. And when we can’t be there, it is hard.

I am worried about the expectations I will put on myself - that WE will put on ourselves.

I write this post to hash out some of the uncertainty, vulnerability, and anxiety I am feeling. And I am certain I am not the only one feeling this way. I hope others who are also feeling this way can find solace that they are not alone in these feelings, and I hope that the discussions it might provoke will take us all to a place that will help us give ourselves the break we need.

Here are a few things my (rational) inner voice is saying to me now:
    Bitmoji Image
  1. Find Balance
  2. Leverage the tools available - but not all of them. Pick a few - if kids (your own or the ones that are yours usually from 9-3) like it, stick with it. With all the changes some stability is good.
  3. Online is not the only way - while I love me my EdTech unplugging often works better for my kids. This is a great resource listing ways to meet curriculum offline at home from Karyn Fillhart
  4. Think of this as a sort of co-op - give kids some of that “real world” learning we talk about so often - teach them how to make a meal, do some yard work, heck, bird watching!
  5. We remember learning experiences over the specific lesson.
  6. Get outside - we can all use recess!
  7. When social media hijacks you emotionally, shut it down or go down another rabbit hole like I did today with #DoodleAndChat (thanks Carrie!) or follow accounts on Instagram like the Good News Movement and Upworthy.
  8. Take this time to do the little things you have been wanting to do but just could find the time and make it a learning opportunity.
  9. Set realistic expectations - we should feel more rested, not more stressed.  Social distancing is meant to keep us healthy - let's make sure that is in all aspects.
  10. Don’t compare. As hard as it is.
  11. Share your feelings with those around you.
  12. If your children go to bed saying the day was fun - that’s a win
  13. If your children go to bed saying the day sucked - that’s not a fail
  14. Above all, remember perfection is a four-letter word
Stay well.
Jen