Thursday 30 November 2017

V is for Version History

#NaBloWriMo Day 22...last day of November...although I think I will finish the alphabet.


As an English teacher, the paper struggle is real!  There have been a number of occasions that I have needed to collect process work and had a TON of papers to bring home.  Version History in G Suite apps has made that a little less of a struggle!

Versions history give you a snapshot of all the changes that have been made over time in a document.  When you go to File --> Version History, the window will change slightly and a text box appears on the right hand side of the screen.  In this text box is a list of dates and names under each date.  If you click on a date it will show what that version of the file looked like and show you who made which change via highlighting.  You can also revert to that version.

In terms of process work, I can see changes over time in a student's document.  You can even rename versions.  So, in terms of process work, I can have students name versions (e.g., draft 1, peer review, self reviews, etc.) and there would only be a single file I would need to access.

I also love that you can track who made which changes in a file.  This has been great for tracking participation in group work.  It has helped me facilitate those "Miss, I have done all the work, my group has done nothing" conversations.

Naming sessions helps if you continuously make changes in a document.  For example, I have slide decks I use when presenting at conferences and summits.  I like to name the version according to the version I presented at each event.  This helps me remember exactly what I said when people reach out after the fact! 

Versions History is a real life saver.  I once had a teacher reach out after 3 hours of her work was erased by a colleague accidentally.  What made the situation worse was that the colleague had then put 3 hours of her own work into the file.  We simply copied the work from the second teacher into a new Doc, restored the version that Teacher 1 had worked on, and pasted the work from Teacher 2 back in.  What would have meant hours of other work, turned into a 3 minute fix.

If you have any other great uses, please leave a comment below!


Wednesday 29 November 2017

U is for Unsplash

#NaBloWriMo Day 21


I am not going to lie...I struggled the with U.  I may have even cursed Eric. However, thanks to a Google Search of EdTech Tools, I stumbled on this gem. (And it turns out Eric had the same idea!  #GreatMinds)

Unsplash is simply a website with over 300K FREE high resolution photos...like this one:

Photo by Wes Powers on Unsplash
This is such a great find for me on a few levels.  Firstly, I love being able to find these sorts of sites to show students.  Secondly, my mind automatically goes to ignite talks when I see sites like this.

The site is curated and they have made collections based on themes.  You can also follow artists you like.  Nothing crazy, but a lot of beauty!

Tuesday 28 November 2017

T is for Twiddla

#NaBloWriMo Day 20


Twiddla is an Online Whiteboard...and it is super simple!  Users can mark up websites or graphics, or start drawing on a blank canvas. It is a really great tool for distance learning led by a teacher or peer to peer.  It even has a built in Equation editor for the mathletes out there.

Twiddla requires no plug-ins or downloads and works on any browser.  Best of all - NO account required!  This is great to maintain student privacy.  (The free version allows for up to 10 participants to meet for 20 minutes.  There are other pricing structures.)

To get started, start a board, and share the link.


Monday 27 November 2017

S is for Sketchnoting

NaBloWriMo Day 19


This letter should not come as a surprise to anyone who knows me.  I began my Sketchnoting journey in August 2016.  I was reading a book and wanted to really capture and remember the ideas.  I had heard a lot about sketchnoting and thought it might just be my answer.  I tried it...and my first attempt was nothing to write home about.


But it did make me realise that I remembered more when I sketched.  The next opportunity presented itself at a staff meeting when we were doing learning around Truth and Reconciliation.  Normally at meetings, I do a lot of multitasking.  I knew, given the importance of the topic, I needed to have a singular focus.  So I sketched again.  That night I went home and left my sketchnote on the kitchen table.  When my husband came home, we engaged in a conversation about the staff meeting and the Indigenous Peoples of Canada.  This would have never had happened if I had taken traditional notes.  It was this moment that I really saw the power of sketchnoting.


Sketchnoting has since become my go to for taking notes.  You can check out my Flikr account to see them all.

Enough about me...let's talk about what sketchnoting is and why should you do it. Check out this video:


The benefits are countless. To name a few, sketchnoting:
  • Helps with retention (study have shown adding visuals increases retention up to 65%)
  • Increases comprehension data 
  • Helps one to concentrate (form of mneunomic)
  • Stimulates neurological pathways 
  • Activates all four learning modalities 
  • Is an anchoring task (keep us from losing focus on boring tasks)
  • Is relaxing!
So now I expect many readers are saying they love the look but they "are not artist".  I'll leave this here for you:


It is all about that growth mindset!  Try it.  Give Doodle a Day or Sketch 50 a try.  Carve out 10 minutes a day to exercise your creativity muscles - they need exercise like any other muscle.


Want some resources?

All in One Jackpot Resources!!  (Research articles, collections, How & Why, Tools, Videos)


Inspiration for layouts and drawings
Practice Activities
Books

Blog Posts (including Slide Decks)


See Sketchnoting in action
Videos
Communities

Sunday 26 November 2017

R is for Read & Write

NaBloWriMo day 18


Read & Write for Google chrome (put out by Texthelp) is one of the best, yet underused, Edutools out there.  (Side note: there are rumours that it might be soon funded by OSAPAC.)

Read & Write is a great tool that provides personalized support to make documents, web pages and common file types in Google Drive more accessible. It’s designed to help all learners, regardless of ability, engage with content in a deeper level.  

Once installed in Chrome a little purple puzzle piece will appear and once pressed, the R&W toolbar will appear. 


I won't go through all features (Texthelp has this great primer to walk through all the features - it's awesome!) but I do want to highlight some of my favourites.


  1. The Play button reads the text!  I have taught a lot of decoders - kids who can read the words but have trouble understanding what they are reading.  I use R&W all the time to get students to read the text as it is read to them.  I have seen HUGE improvements in reading comprehension.
  2. Talk and Type.  I use the Voice typing feature in Docs all the time.  The Talk and Type feature gives me this functionality on all websites.  Thinks about how much easier filling in paragraph questions on Google Forms will be!
  3. The Screen Mask darkens the entire page except one thin line that moves with the cursor.  This is a great way to help readers who are easily distracted by other text on the page focus on particular areas.
  4. The Highlighting tool allows you to highlight text but the bonus is the collect highlights.  When you collect highlights a new Doc opens and each different colour is grouped together to collect common ideas.  This is a great for those whose thoughts are all over the place.  Use Talk and Type to record the stream of consciousness then so back, highlight similar ideas in the same colour, collect highlights - et voilà!  All common ideas are together.
  5. The voice notes tools is great for teachers. I have found that sometimes tone is lost in written feedbacks.  Voice notes allows you to record up to 60 seconds of voice and insert it into the Doc.  Once inserted, a play button appears in the comment box and comments can be listened to.
The tool is rich for all learners and educators.  If you have not tried it already, you need to give it a try!


Resource:
When I do PD with teachers around Read & Write I like to walk them through this Hyperdoc.


Q is for Quest

#NaBloWriMo Day 17 (a few days late)...

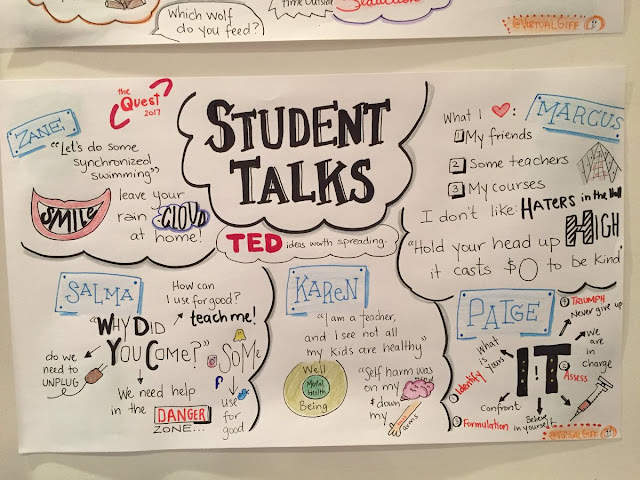
Each November, my district, the York Region District School Board, host a three day conference called The Quest.  Every year we are on a Quest for understanding in an area.  This year it was Student Well-Being.  I was working in the playground and got to sketchnote for three days...it was awesome.  Rather than talk about each keynote, I will let my sketches do most of the talking.

Dr. Michael Ungar outlined what all kids need to build resilience.  He also reminded us that Systems need to be adjusted as much as our children need to be adjusted.

Dr. Jean Clinton was refreshing, open and honest in her keynote.  She explained tat anxiety is good...but not when the fear of the bear never goes away.

Five YRDSB Students reminded us that they need help to navigate the waters of Social Media, and that school can be hard when you have so many "Haters in the Hall".

Stephanie Fearon reminded us that teachers too need to protect their well being.

My favourite part of the week was the second round of  Student TED-style talks.  They moved me to tears.
The Thursday evening keynote speaker was Margaret Trudeau.  When I went t show he my sketch the table asked if I was going to give it to her...so I did.  ☺


Wednesday 22 November 2017

P is for Pocket

#NaBloWriMo day 16


In my day-to-day I often come across articles I would love to read, or blogs I would love to explore, or videos I want to watch.  The problem is that when I find them, I don’t necessarily have time to read, explore, or watch.  Enter Pocket. 

Pocket saves interesting articles, videos, and more from the web for later enjoyment. Once I save to my Pocket (which can be done on my computer OR mobile device), I simply need to visit the Pocket website or mobile app to access my saved content.

In Pocket you can tag, delete, Favorite, or archive saved items.  If you install the Chrome extension, pocket will integrate into your Twitter - making it a piece of cake to save Tweets you want to revisit. 

With Pocket, I find I can catch up on all those great articles and videos when I have time. I love opening the app while I stand in line at a grocery store, wait for my kids to recover from a meltdown, or before I go to bed.

Pocket is available for major devices and platforms including iPad, iPhone, Android, Mac, Kindle Fire, Kobo, Google Chrome, Safari, Firefox, Opera and Windows.


Monday 20 November 2017

O is for Office Lens

#NabloWriMo Day 15


A big shout out to my summit/conference pals Mario, Coulter, and Ammar from Microsoft for this one.

Office Lens claims having it is like having a scanner in your pocket - and it's right.

Office Lens trims, enhances, and makes pictures of whiteboards and documents readable. You can use Office Lens to convert images to PDF, Word and PowerPoint files, and save to OneNote,  OneDrive, or your local device.   (Not Google Drive...I asked 😆)

From an educational perspective, users can  scan handouts and annotate them.  The app even has the ability to crop out everything around it (including backs-of-heads!).  Cool feature: If you take a picture of something at an angle, the app will align and edit the image to appear as though it's directly in front of you.

The tool even has its own Twitter account!  Very simple to use, and very useful...definitely a tool to try out.

N is for Nuzzel

#NaBloWriMo Day 14


Keeping up with Social Media (or SoMe as I like to call it) can be time consuming and overwhelming.  I hate the feeling that I have missed something big, but I don't like to feel like I need to constantly be checking my Twitter, Facebook, Instagram, Snapchat, etc.  So when I heard about Nuzzel, I knew I had found the tool for me! 

Nuzzel offers personalized news discovery and curated newsletters for busy professionals, via web, mobile apps, messaging bots, and email newsletters.  In my case, I have linked my twitter account and every morning I get a summary of what my Tweeps are sharing. 

The first section is the top 5 stories trending on my twitter feed in the last 24 hours.  It also shows how many people I follow have tweeted it.

The second section is the trending stories from friends of friends.  There does not seem to be any method to how this is picked...but I have found some great reads and follows in this section.

The final section shares the top story from a (seemingly) random person I am following, that was not in the two sections below.

I have my daily digest scheduled for 7am and often start my morning reading the twitter headlines.

There is an app for Nuzzel for iOS and Android devices as well as a web-based tool that curates almost like a news agency.


M is for Mystery Skype & Hangouts

#NaBloWriMo day 13...1 day late...sorry!


Mystery Hangout/Skype is a critical thinking challenge that your class takes part in while connecting with another class somewhere else in the world.  The goal is to guess the other school's location (country, city, school name) by asking only yes and no questions before they guess yours!


Finding partners is as easy as Tweeting someone you know who is involved in these or searching the G+ or Microsoft community.

When preparing students, consider the following:
  1. Be sure students know about your area so they can answer the questions accurately.
  2. Practice question asking skills - general vs. specific.
  3. Practice Map use (atlas or digital maps).
  4. Consider a practice Hangout or Skype to ensure technology is cooperating.
  5. Prepare a shared document for note taking.  (Consider Google Docs,, Forms and Sheets.)
  6. Determine and assign roles for student during the chat.
  7. Co-create guidelines for video call etiquette (include don’t wear any clothing that could give away your location (i.e., sport team hat/shirts).
  8. Do a practice session with the teacher acting as the other class.  This allows for discussion and feedback.
The benefits for doing Mystery Hangout/Skype are plentiful, and include:
  • Authentic purpose for research
  • Challenge-based learning
  • Opportunities for collaboration & communication globally
  • Creates a global community of learners
  • Creates partners for future projects
  • Supports critical thinking practice
  • Opportunity to improve listening & speaking skills
  • Supports student-led learning
For more information, check out my one pager!


Wednesday 15 November 2017

L is for List (on Twitter)

#NaBloWriMo Day 12...one day early - cause tomorrow is a LONG day.  BTW - I realise this is a little bit of a cheat in my A-Z theme.


I had a conversation with a colleague the other day who said he was going to take a break from Twitter. When I asked him why, he said that he was tired of the “noise”.  While I absolutely see the value in taking a break from social media, I sensed that he didn't really want the break but he felt forced to because of his feed. When I asked if he would unfollow certain people he said for political reasons he could not always do that. I then asked if he created lists on Twitter and he gave me a confused look. It was at this moment that I realized I needed to share this powerful Twitter use.


In Twitter you can create public or private list. You can add people to these lists, they can be people you follow or people you don’t (i.e., you can add someone to a list without having to follow them). Lists that are public are viewable by everyone and can be followed by other people. When you add someone to a public list, they get a notification. Private list are for your eyes only.


I use list for a variety of reasons. When I go to a conference I start a list and add people I interact with. This allows me to remember them if I want to reach out and pick their brains about conversations we had at said conference. It is also helped me out in times when I have run into them at another conference and can't remember their names. I can go back to my list to hep jog my memory. I also have a list called “love to follow”. These are the people I love to follow on Twitter and give me a quick snapshot of the things I really need or want to hear. I have a list that is populated solely of people who teach in my district. When I want to tweet about District initiatives I go to this list when choosing who to tag.


To see your list simply click your profile picture in the top right-hand corner and scroll down to List. From there you will see list you are subscribed to - these include those you created or those you followed that were created by other people. You will also see lists that you have been added to. I often find ones to subscribe to on this tab.


To create a list, or add someone to a list that exist, simply click the three dots beside the follow button on the person’s page. You will be given an option to “add or remove from list...”. From here you will be taken to a page with all of the list you've created. You can add people to lists here (you can choose multiple) and you can also create a new list by pushing the “create lists” button at the bottom.

Lists are really that easy and when used well, they can be very powerful in terms of how you use Twitter and how you seek information.


K is for Keep

#NaBloWriMo Day 11...it is #YRDSBQuest this week so apologies if I seem brief!


When Google Keep became a core app in the GSuite I decided to explore it some more and discover some uses for the classroom.  

Essentially, Keep is a virtual notepad, or sticky notes.  It is a small little tool but quite powerful if you roll it into your GSuite workflow.

Here are 9 things I like:

  1. Take a picture and save to Keep.  This is easy access for board notes you have written and might want to come back to at another time.
  2. The Google Keep Chrome extension!  You know those times you see something on the interwebs and you want to explore it and don't have time or want to come back to it later?  That's where the extension comes in.  Click the icon, type a title and some text and the link is automatically inserted.
  3. Mobile voice notes.  This is only available on mobile devices but it is great.  You can record voice notes that can then be imported into other GSuite apps like Slides and Docs - really great for giving feedback!
  4. Notes can be drawings.  You don't only need to types notes.  You can draw something (think small sketchnotes!) and then write notes underneath.
  5. Archive notes for future use.  I recently co-organized an EdTech camp.  We made all of our to do lists on Keep and then archived them when things were done.  Now we can pull them up next year when we do the camp again.
  6. As a former English teacher I found I often gave the same feedback again and again.  You can make notes of your common feedback comments and then use the Keep notepad in Slides and Docs so import them into student work.
  7. Colour code!  Keep offers a variety of colours (some new ones were just added a little while ago) for your notes.  I find this really helpful for visual cues.  I encourage students to keep notes for different units or subjects in different colours.  There are also labels to help with this.
  8. Although it can be glitchy, there is also a "Grab image text” option.  In this case you can import a picture and when you grab the image text it will convert the text into editable text in your note. Very cool.
  9. Reminders - for those of use with memory challenges! Keep offers location based reminders (remind me when I arrive at school) and time based reminders (remind me at the 1pm -  the beginning of period 3) which is very handy.  That said, I would love if a list could have multiple time based reminders.  (Hear that Google?!)

A lot of this I learned playing, but a lot I learned from Matt Miller, Kasey Bell, Alice Keeler and Eric Curts's blogs - thanks EduHeroes!

Tuesday 14 November 2017

J is for Jen!

NaBloWriMo Day 10


I was named after my grandmother, Jesse.  My mom thought about calling me Jessica but feared it would be too popular.  As a woman born in the late 70s - Jennifer was definitely not a unique name. 

So, to keep up with my A-Z theme, I thought I would pay homage some of the Jens in my professional life!


  1. Jennifer Casa-Todd, or JCT as I affectionately call her, is the author of Social LEADia: Moving Students from Digital Citizenship to Digital Leadership.  It is a wonderful book about the importance of digical citizenship and encouraging students to not only be responsible digitally, but also to encourage them to be leaders online.  She is an amazing educator and friend.  (She is also the other half of #CDNJens.)
  2. Jennie Magiera and I first met, albeit briefly at ISTE2016, and then connected again in Washington DC when she was a #WDC17 coach.  She shared her story about not letting the dragons get you down - and our cohort still talks about it.
  3. Jennifer Gonzalez - is the author of the Cult of Pedagogy blog and podcast.  I have yet to meet this Jen but I do feel like I know her as I listen to her podcast religiously.  Covering a variety of topics and with her soothing voice, The Cult of Pedagogy is a great resource for teachers of all subject areas and levels of experience.
  4. Jen Apgar and I met at ISTE in June but knew each other from Twitter before that.  She is passionate, inquisitive, and a genuinely friendly person.  We have brief but great convos when we see each other and it is always a treat to run into her at conferences.


Monday 13 November 2017

I is for Ignite Talks

#NaBloWriMo Day 9


In April 2017 I was invited by Fair Chance Learning (Thanks Martha, Dustin, and Brian) to participate in the Connect 2017 Ignite Talk event. I nearly declined because my team was invited to  dinner that night, but I decided this would be a great opportunity and challenge so instead, I accepted.  Boy was I right!


For those who are unfamiliar, an Ignite talk is a talk where you are allowed to have 20 slides and they auto advance every 15 seconds.  You need to perfectly know your content and your timing.  Their tag line is enlighten us, but make it quick.  It is tricky in so many ways...but one of the best writing and presentation experiences of my life.  

I think it is a fantastic oral presentation activity for students.  It is only 40-80 sentences, there is little to no reading off the screen, and it allows for choice and flexibility to personalize.

When you do it with students, or do one yourself, here are my tips for success:

Writing 
I made a chart with the image on one side and what I wanted to say on the other.  I found that I could get 2-4 sentences per slide for the proper pacing and timing.

Slide Images
I am a firm believer that a slide should have no more than 5 words.  Let the image support your talk or you will be tempted to read off the screen.

Memorizing
First,  I took my notes (mentioned above) and highlighted a few words for each slide.  My friend Kim called these sticky note lines.  I associated these words with the slide image and would jog my memory for the slide.  Then, I recorded myself using voice notes on the iPhone.  Then, everyday I got in the car I listened to the speech and talked along as best I could.  Finally, after the week of listening was done, I would recite the talk every time I got in the car.  If I got stuck, I would review my notes when I arrived at my destination.  In two weeks I had it down pat.

I have been fortunate enough to give my Ignite talk at four events now: Connect 2017, ISTE 2017, MindShare Learning Technology's EdTech Summit 2017 and BIT 17 with the Ministry of Education (thanks Bernadette and Brenda).  Here is my Ignite.


Sunday 12 November 2017

H is for HyperDocs

#NaBloWriMo Day 8...late...but catching up!


In the summer of 2016 my Twitter feed started to flood with #HyperDocs.  Intrigued, I started to explore post and immediately bought the book by Lisa Highfill, Sarah Landis, and Kelly Hilton.  I was about to start a new position as an instructional coach and as much I wanted to try them out in the classroom, I could not wait to share HyperDoc with other teachers.

If you ever meet Lisa ask her about her first trip to Toronto...it's a good story wherein I almost had her deported! 

HyperDocs are Google Docs, with interactive elements, designed to replace the worksheet method of delivering instruction. By sharing a link to a HyperDoc, teachers can get students thinking, exploring, collaborating, and creating all on their own, shifting teachers from the lecturer to listener.   With HyperDocs, teachers can personalize the learning experience and better connect with students.

People often call Multimedia Text Sets (MTS) HyperDocs, but this is a misnomer - HyperDocs are so much more than that(Note: MTSs are also called Choice boards  - a term coined by Derek Tangredi - which I love.)   A lot of people also see HyperDocs and call them clickable Docs, or a webquest...but again, it is more than that.

The HyperDoc cycle is robust.  It includes Engaging, Exploring, Explaining, Applying, Sharing, Reflecting, and Extending.  The idea is that in order to have students fully engage in the learning, all seven parts of the cycle should be followed.  Choice boards can be used to support some (or all) parts, but it is the pedagogy behind the curation of the board and the involvement in each part that really matters.

In the Engagement phase we draw in the learner - peak their curiosity, and hook them into the learning.  In Explore students engage in self-directed learning.  This phase is often facilitated through an MTS/Choice Board so the needs of the individual learner can be met.  Some might want to watch a video, others might want an online manipulative, and still others might like to read an article.  In Explain, the teacher, after seeing the learning in the Explore phase, goes back and fills gaps they noticed in the students learning.  Next, students Apply.  To me, this is one of the most important phases as it takes students from consumer to creator.  I actually call this the Create phase in stead of Apply.  I also always give choice in this phase.  What one students might present in a video another could do in a podcast, or poster.  I feel learners should be able to show me how they have made understanding.  Sharing is the next phase and I always emphasize the importance of letting learners share to an authentic audience.  I really feel if the only audience is the teacher than the learners produces for that teacher, and not for the learners him/herself --> which is when the magic happens.  Reflection allows learners to think about the learning that has taken and really spend some time becoming aware and understanding one's own thought processes.  This helps with growth.  Finally, Extending takes the learning beyond what might be covered traditionally.  It allows the learners who is really keen on the subject to explore in more depth or in a different way.

Above all, there are only two rules with HyperDocs - share freely and give credit!

If you want to explore a little more, here are some of my resources:

Here are some Choice Boards I have created.


I created this resource for EdTech Tools to use with each phase of the cycle.  Note: I update this regularly so feel free to share and add to your drive but if you make a copy it will not be updated.

Here is my What's the Hype with HyperDocs slide deck.  I particularly like the slide about how a lesson looks transferred from traditional to HyperDoc (Thanks Lisa for sharing). Also, I like the slide with the choice boards for 4Cs.

Are you on Twitter?  Some of my fav HyperDoc people include not only the HyperDoc ladies linked above, but also: