Monday, 5 November 2018

Back channelling with YoTeach!

The Tool


About the Tool
When Today’s Meet closed down last year, I was really upset. I had used it as my go-to backchanneling tool for a number of years. and, given the outcry on Twitter, I was not the only one who was heartbroken and in need of a new tool. Lo and behold, the fine folks at the Hong Kong Polytechnic University came up with a tool to mimic Today's Meet, and it might even be better (more features and no 140 character limit!).  It is called Yo Teach!

For those who don't know, a back Channel is a digital conversation that can happen synchronously or asynchronously. You often see these when people tweet with a hashtag at a conference to have conversations digitally.

Yo Teach! allows users to enter their name and type comments that are displayed on the website. Rooms can be locked down by teachers or made public, a PDF transcription of the conversation can be generated, pictures even can be uploaded and annotated by the poster or others in the conversation.  The conversations can also be password protected. (See here for all features and how to videos)


How to Use the Tool
  1. Go to yoteach.hk
  2. Title your room and give it a description.
  3. Check the boxes if you want to hide the room, password protect it, and enable admin features (I highly suggest doing this as this is where you can erase comments, generate the PDF, and have much more control of the “room”.)
  4. Hit create room.
  5. Enter a nickname, agree to the terms, hit submit.
  6. Get “talking”

If you enable the admin tools, you will have a pre-generated QR code, as well as a link, that you can share with students so they can access the room.

Pro tip: Have a set of norms typed out before you open the room and paste these as the first post.  This way, everyone knows what is expected of them. My biggest norm is “if you would not showed it out in class, don't type it here”.
Why I like it
Tools like Yo Teach! give an opportunity for all students to have a voice.  Introverted learners, students with exceptionalities, English language learners (or English-speaking students in foreign language classes)  all have a safe space and time for thought before sharing.

I use them in my classroom to give voice to those who might not otherwise participate. One year, for example, 1/3 of my students in a grade 11U English class were English language learners. They had brilliant ideas but weren’t speaking class because they were not confident in their Mastery of the language. When I opened up the backchannel, it gave them time to think and in some cases even use tools like Google Translate, to develop their ideas before sharing. It most definitely made the conversations we had in that class far more rich than they would have been without a backchannel.  


Three uses in education
  1. Use a backchannel during presentations so the audience can ask questions and make comments (they can be moderated if you enable the admin tools). This works in classrooms, school assemblies and/or faculty meetings.  Backchannels in these events allows the audience to ask questions without interrupting the flow of the speaker. 
  2. It is also great during conferencing times when a student might have a question but the teacher is otherwise occupied with another student or group of students. Others in the class might be able to offer a solution before the teacher is free - like we always say - the smartest in the room is the room itself. 
  3. Use the picture upload or draw feature to capture ideas visually.  You could annotate text, draw complex molecular structures, the sky is the limit. 


This post is part of annual NaBloWriMo exercise wherein I  write a blog post every work day in November.

Friday, 2 November 2018

Digital Visual Poetry Tool

The Tool

About the Tool
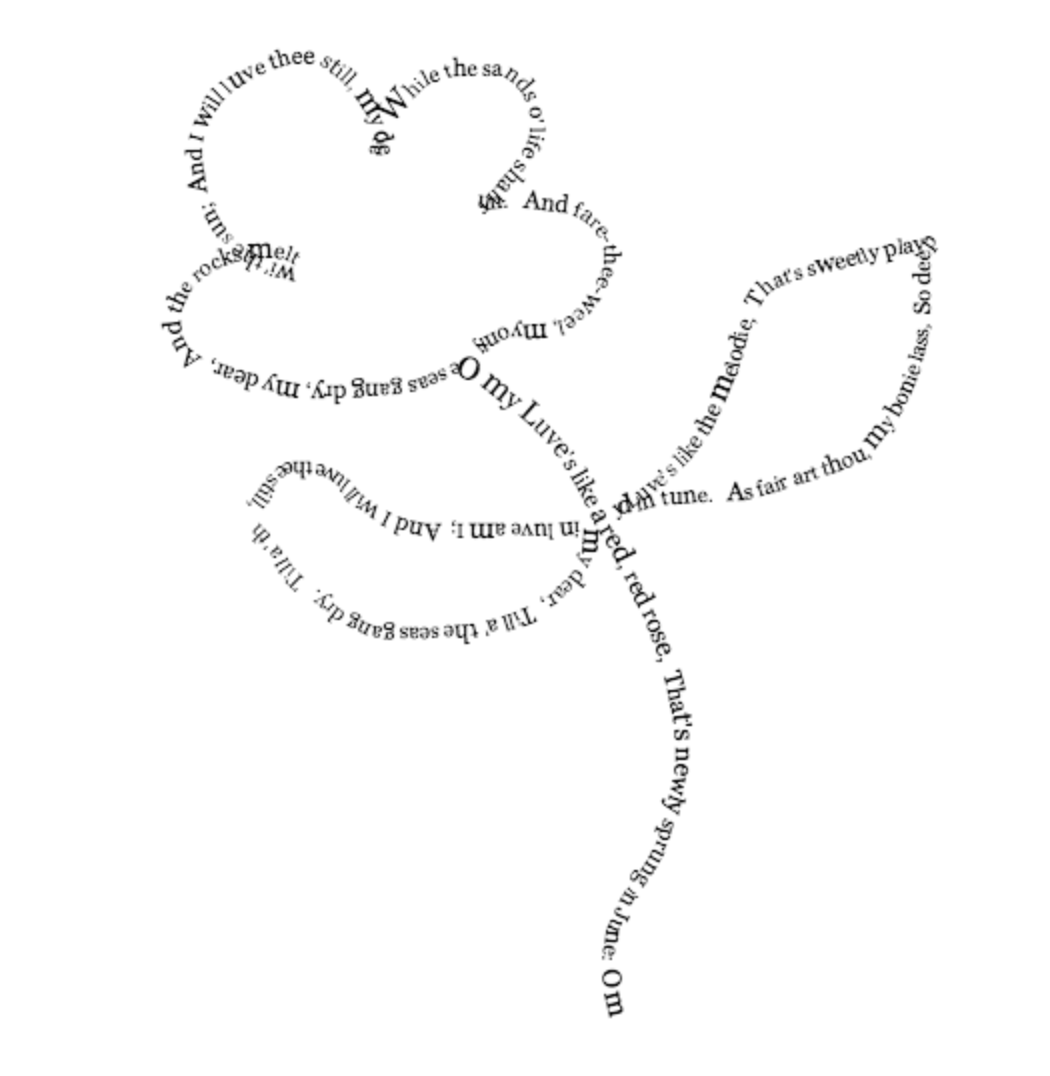
Earlier this week my friend Andrew Fenstermaker reached out to ask me about a tool for making shaped poetry - a.k.a. concrete poetry.  I shared Visual Poetry - an online tool that allows you to paste in lines of text and then, using your mouse or track pad, have that text lay out on the page in any shape you desire.  This is an example of Robbert Burns’ poem “Red, Red Rose”.

How to Use the Tool (from the site)
1. Enter your text in the "Text" field.
2. Optional: Choose minimum size, maximum size, random angle, text color, and/or background color.
3. Click anywhere on the page, hold down the mouse and draw a picture.
4. Click "Clear" to start over or "Save" to save your drawing as an image.


Why I like it
I love the creativity aspects of this tool.  Students can make meaning not only with their words but also their art.

Three uses in education
1. The obvious - it allows students to create concrete poetry
2. Allow students to write, in any genre and attach images to the words to make more meaning.  I can see this working in procedural writing tasks.

This post is part of anual NaBloWriMo exercise wherein I  write a blog post every work day in November.

Thursday, 1 November 2018

Web QR (NaBloWriMo 2018 is here!)

It is that time again! NaBloWriMo! November means a blog a day for me!  Some of you may have heard of NaNoWriMo; it is a writing activity that challenges writers to write a 50,000 word novel in one month (NAtional NOvel WRiting Month). Authors commit to writing every day.

While I don't feel I have a novel in me, I often say I wish I blogged more. So, two years ago, when I started in my current district-level roll, I decided to challenge myself by writing a blog post on every work day in November (notice I replaced NO from Novel with BLO from blog).

Last year, I did an A-Z theme (thank you Eric Curts, for the idea). This year, I am again going to pick an EdTech tool to highlight each day explain why I like, and three ways I see it used in education. Note that I say education and not classroom, this is intentional. As a consultant, a lot of the work I do is around coaching teachers and presenting to adults, so sometimes this will be my focus. Without further ado, here we go...  

The Tool

About the Tool
QR codes are those pixelated squares you see in magazines, on signs, just about anywhere. When scanning these codes, a variety of things can happen including automatically adding information to someone's contacts, launching an app, but most popularly directing the scanner to a website.  

QR codes are easy and free to generate, and can be accessed simply on a mobile device with a QR reader or, if you have iOS 11 or above on your iPhone, you simply need to scan the QR code with your camera app and a pop down notification will appear that will take you to the linked website.   

Earlier this week I was helping a colleague create a hybrid analog/digital breakout EDU activity.   We realized that students would be working with Chromebook and not mobile devices. This posed a problem with one step where they had to access information using a QR code.  A quick Google search later and we found web QR. It is an online service that facilitates reading QR codes with computers that have webcams.  

How to Use the Tool
1. Go to WebQR.com
2. Give permissions for the site to access your webcam,
3. Hold the QR code in front of the camera, and a link will generate.
4. Click the link


Why I like it
Chromebooks are excellent, economically friendly tools for a classroom. QR codes are simple ways to direct students to resources or activities. Having a tool that can make these two things work together is amazing in my books.

Three uses in education
  1. Have QR codes printed and put in a small binder in your classroom. Each QR code can link to important documents students might need during the course (e.g., syllabus, code of conduct, etc.).  WebQR is especially useful in this situation for learners without mobile devices in class.
  2. Have stations at faculty meetings wherein you put QR codes in various locations. Instead of teachers sitting at the same table with the same people the entire time, they get a chance to stand up and walk around and can easily access information without facilitators having to print everything out.
  3. Leave teaser QR codes around school campus to promote events. QR codes with no writing peak curiosity and people can't resist scanning them to see what it is all about.  (I realized this idea is not for this tool exclusively, but I have done it and it is a really cool thing to see everyone talking about the mystery QR codes.)

This post is part of
annual NaBloWriMo exercise wherein I  write a blog post every work day in November.
Monday, 8 October 2018

Visually appealing slide decks

One thing I wish I was better at was designing beautiful decks.  If given a template I can do ok, but carte blanche I am kind of useless.

I recently started exploring the Microsoft Innovative Educator (MIE) programs (excellent, FREE!,  resource - and applicable beyond Microsoft products) and came across one called Presentation Design 101: How to Create Visual Slides with Impact.  It is exactly what I needed.

One great thing I learned was how to use a website called Coolors to generate a colour pallette to match a photo - and it is so easy! I learned about Coolors back in June 2018 at AppleMania18 when I attended one of Marcus Painter's sessions, but this feature was new to me.

Here is how:

  1. Visit Coolors.co
  2. Click "Generate"
  3. Click the camera icon to upload a photo
  4. Watch the magic happen! (See the #EDUgif below)


Once you have the colours, you can then copy the Hex Colour Code to use in your deck as colours for fonts, shapes, etc.

To customize colour do the following:

  1. Copy the Hex Colour Code (the number preceeded by the #)
  2. In the slide deck, Pick the element for which you want to change the colour
  3. Click the Fill bucket or font colour (depending on the item)
  4. Scroll down to "Custom"
  5. Copy the Hex Colour Code into colour box.


This was only one small tip - be sure to check out the entire "course" for more.


Tuesday, 11 September 2018

Google Read and Write for the Win!

My son, who is in the third grade, hates homework.  His biggest anxiety in returning to school this year was that he would get a lot of Homework.  I also hate homework, especially in primary.  So last night, when we had to sit down to write a 2-4 minute script for an All About Me project, I was dreading it.  Then I realised, I could make this so much easier on him.  I spent all this time training teachers on Google tool, why not train my own kid.


I asked him to grab his Chromebook and we opened a Google Doc.  Then, I showed him the magical puzzle piece - Google Read and Write (specifically the talk and type feature).  After setting the microphone to French (he is in a French Immersion school), I asked him to say "Bonjour, je m'appelle Bennet" (Hi, my name is Bennet).  It typed for him.  His eyes grew the size of saucers.  As he left the room to get his poster I heard him say to himself "This is so cool!" and the kid who hated homework, stuck to it for 2 hours!


He learned that the mic does not always hear what he says and he may have to type some words in himself.  He also read A LOT of French.  He didn't speak and leave what was written; he read and corrected as it went.  The experience was so much more rich than struggling through the phonetic of what he was attempting to write or having me type it for him.  He felt empowered.  I was thrilled.  and I witnessed the power of using GSuite with Littles!

That said...this all begs the question( as my friend Peter Cameron pointed out) - "how do the kids who don't have the same supports at home feel/cope. And so the homework debate continues..."

Wednesday, 5 September 2018

From a Lens of Empathy

Yesterday was the first day of school.  For me it is not the typical day.  I don't have students, I did not have to set up a classroom, I did not review a syllabus.  As a member of a district team, I went into an office type building and "met".  The meetings were centered around team building.

The team I am currently on is one of the best teams I have ever worked with.  We are not without fault, but we work hard, get along, and get the job done - usually very well....#IMHO.

We did one activity where we reviewed a survey we took on the last day of school in June.  The survey questions were around aspects of our roles and our procedures in a Stop, Start, Continue format.  The last day of school is an interesting time for teachers.  We are eager for two month away from formal work, and it is often a time to let go of feelings that have been carried in the year.  There was a lot of honesty in the responses, and it was interesting to read them once we return from a two month break.

To be honest, I had seen the statements that were highlighted in our meeting the night before as I searched My Google Drive for something else.  A few of statements hit home....hard.  My back was up.  I spent some time talking through the emotions I was feeling, the night before the first day - a day that is often wrought with below the surface anxiety.  I came into the meeting prepared to discuss from a place that presumed positive intentions.

What struck me the most about the activity, however, was how our team co-ordinator, Trevor Krikst, framed the activity.  He started the conversation by recognizing that the discussion we were about to have might (would) be difficult.  Then, we said the words that really stuck with me.  "When looking at the statements, let's approach it from a lens of empathy". 


The sentiment is not new - but there was something in the way he phrased it that struck something in me.  It made me not only think of the activity (and team/personalities) at hand, but also about how I approach my role as resource teacher.  It will be my mantra for the year.

I have a ton of respect and admiration for Trevor.  He is a phenomenal facilitator, critical thinker, and a down to earth funny guy (#DadJokes). I really appreciate this lens he has encouraged me to see through this year.  Thanks Trev!

Monday, 3 September 2018

VirtualGiff's Back to School Top 7 Google Tips - Day 7 - Making a File live in Two Places - SHIFT +Z!

Earlier this week, I decided to share one of my favourite tips every day for the seven days leading up to the new school year.  (See the full blog post here)  Here we go for day the final day - day 7.  Happy labour day - and have a great first day for those starting back to school tomorrow like me!


VirtualGiff’s Top 7 Google Tips


Note for Mac Users: When you see CTRL in this pot, use COMMAND instead - it will do the same thing.


I have a document I want in two folder but I don’t want to make a copy because then when I update I need to update in two places!

Tip #7 - Shift +Z t
You can have the SAME document be live in two places!  Simply go to the file in your drive single click the document title and then press CTRL +Z (at the same time).  You will get a pop up box with your Drive folders.  Drill down (or up) to the additional folder you want to add the file to and click the “Add here” button.  Any changes made to the file will be reflected when you access the file from wither folder.


Have a great first day back tomorrow!!