Thursday, 30 April 2020

Snapdrop - transfer files across multiple platforms

We're into week 4 of Emergency Remote Learning (6 if you count the two weeks that were not teacher led) and we have had our fair share of challenges.  We are fortunately to be a tech rich household.  My husband has his PC laptop, I have my Macbook Pro laptop, My oldest son has an iPad and my younger sons each have a Chromebook.  We also have 4 iPhones to use between the 5 of us (two are old ones with no SIM card so are more like iPods since they can't make calls and have no data but can access wifi).  One of the challenges we have faced in when the boys (who are in grades 2 & 4) do work that we need to photograph and put on a Google Slide (for example).  With our older son it was easy, take a photo, airdrop it to his iPad...but for the other guys - no such luck - until now!!

Our old workflow was as follows:
  1. Take a picture on my phone
  2. Airdrop it to my Mac.
  3. Log in to child's Chrome Profile on my Mac
  4. Upload it to their Google Drive
  5. Remind child, who has lost all focus, that we are still working on THEIR work.
  6. Child whines a lot, finds the file and uploads it to the Slide.
Then, my friend Joel Charlebois told me about Snapdrop.  #GAMECHANGER.  It is, as they "the easiest way to transfer files across devices" on the same wifi network.

Snapdrop

I have bookmarked Snapdrop on each device in the house (and added it to my homescreen on the my iPhone).  Now, when we take a picture on one device, we simply open Snapdop on the device with the image and on the the device we want to receive the image.  (In Snapdrop you see all the devices on the network with Snapdrop open - as in the image below)


From the device with the image, click the device to which you want to transfer.  A dialog box will open showing the files on your device.  Find and click the file you want to send.  The receiving computer will see that a file is being transferred.

When the transfer is complete, it will ask if you want to download the file to your device.  If you do, click download, if not, click ignore.


If you choose to download the file, a dialog box will open asking where on the device you want to store the file.   Select your destination and the file is now saved on that device!

It is a great way to transfer across platforms as it work on iOS, MacOS, Android, Windows, etc.

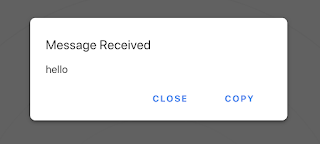
Also, you can send messages from one computer to another by right clicking the device name (or long holding on a mobile device).  A message box will appear, you can type a message and hit send.  The message will appear on that device where Snapdrop is open.


Note, None of your files are ever sent to any server. See the Snapdrop FAQ for more about their privacy.

Inserting Audio into Google Slides

Looking for an easy way to insert audio into Google Slides?  Watch this 4 minute How To video, and/or see the steps below.


Step 1: Record your voice
  1. Go to online-voice-recorder.com
  2. Click the record button (the red mic).
  3. Start talking!  When you are done, press the red button to stop.
  4. Click Save.  (The video will be saved to your computer - pay attention  to where so you can find it.)
Step 2: Upload the audio file to your Google Drive
  1. Go to your Google Drive.
  2. Optional: Create a folder for all your audio files.  
    • To create a folder:
      • Click New --> Folder --> Name it (e.g., Audio recordings)
    • DON'T FORGET TO MAKE YOUR FOLDER (or just file if you don't make a folder) VISIBLE TO PEOPLE.
      • Open sharing setting so anyone in your district has access to hear the audio.
        • Right click the folder and click Share
        • In the pop-up dialogue box,  click Get shareable link in the top right corner.
        • In an education account, by default it will allow everyone in that domain (with that kind of email account) to view (or in this case listen).    Make your choice and click Done.
        • If you have made the folder, every file you put in that folder will have that sharing setting so no need to do it again and again (hence my prefenece for the folder).
  3. Upload the audio recording. 
    • To upload:
      • Click New --> File Upload (find the file from Step 1 on your computer)
Step 3: Insert the Audio into your Google Slide
  1. On your Google Slide, Insert the audio
    • To insert audio:
      • Click Insert --> Audio
      • Select the file you recorded in step 1 and uploaded in step 2 and click Select
  2. A grey speaker icon will appear on the slide - this is the audio.  You can move it and adjust its size as desired

Bonus:  You can also attach the file to a Google Classroom Stream or Classwork post!

Bitmoji Image


Sunday, 26 April 2020

A Whiteboard extension for Google Meet

This morning I woke up and the first post on my Twitter feed was by Darren White about a new Google Meet extension called Google Meet Classroom Extension which adds a raise hand feature and whiteboard into Google Meet.  It allows for drawing, inserting typed text and LaTeX math.  Darren showcases the tool nicely in this video (consider subscribing, he's got good Google stuff on there!):


So, of course, I jump on my computer to give it a try and here are my initial thoughts:

Pros:

  • Simple integration of a whiteboard - note you need to be in Present mode then start the whiteboard or only you will see it.
  • Math and chem formulas enter easily with LaTeX.
  • Slick interface as the buttons appear on the bottom bar.

Cons

  • The raise hand feature wasn't working for me - only the person with the raises hand saw their hand was raised.  Apparently there can be up to a 20 second delay - and truth be told I did it quickly.
  • Can't see the chat etc. when activated, take sthe whole window (when i saw this I was hoping it was a little screen within the Meet window, but alas, no.
  • Can't insert an image to annotate (Jamboard much more dynamic).
  • Apparently the creator's server is maxed out so not sure if it might start crashing.

Overall - simple for a quick whiteboard, good for beginner users, personally I would stick with Jamboard, AWW App or Whitebord.fi for anything beyond a basic need to show something quickly.

Monday, 13 April 2020

7 Google Classroom Tips for Teachers

In this time of Emergency Remote Learning (I purposely call it that thanks for AJ Juliani's points in this blog post), many teachers are using Google Classroom more and more.  Some are comfortable with the tool, others are brand new.

If you are a Canadian educator and you are new to Google Classroom and want some FREE PD, check out EdTech Team Canada's Virtual Learning Series.  

For those who are familiar with Google Classroom and want a few pro tips - I have create a slide deck which has 7 Google Classroom tips for teachers including:

  1. Creating and accessing the Comments Bank, 
  2. Quickly Switching between student work when grading, 
  3. Annotating student work in the mobile app, 
  4. Tagging Students in comments, 
  5. Managing notifications (to free up your inbox!), 
  6. Adding audio instruction and feedback
  7. Adding video instructions!
Click the image below for the slide deck!